This article gives an introduction to my preferred development setup of 2018 for building mobile applications: React Native with TypeScript and CocoaPods, coded in the awesome Visual Studio Code editor.
Over the past 8 months I’ve had the pleasure of working on a side project with a very special customer: my Dad. His idea was to create an iOS app to give users a consolidated view of the investments they hold across multiple accounts. I suggested that such a thing must surely already exist – which it did, but none of the existing offerings suited him, primarily due to his comfort level in trusting the app developer to store and manage his investment data in a secure manner. With the seemingly constant stream of news covering large corporations being hacked, I couldn’t blame him for this concern.

With the delivery of the app’s spec accompanied by a hand-written cover letter, the project was on.
In an effort to use this side project as a learning opportunity, I picked a technology that I’d been interested in for ages but had yet to find a use case for: React Native. As a huge React fan for building web UIs I was instantly hooked. There were a few gotchas along the way but my experience was almost entirely positive. I intend to cover a few interesting aspects of building this app over the next few blog posts – including SQLite, Dropbox integration, syncing data between devices, and testing – but this one will focus on simply bootstrapping the React Native project that I’ll build upon in future posts.
Tools of the trade
To follow along with this article you will need a Mac, and the tools indicated in the “Installing dependencies” section of the Getting Started page of the React Native docs. Please work through this section of the linked doc before moving on!
TypeScript
TypeScript is a tool to enable type support in JavaScript projects which I intend to use on every one of my JS projects going forward. I encourage you to give it a try – for me, it felt like the piece that JS was missing. I am a huge fan of using it for both React Native as well as web development.
I had initially written a medium-length novel on setting up TypeScript to work in a React Native app (RN going forward), but discovered an extremely helpful little project that offers a template to quickly bootstrap an RN app with built-in TypeScript support. Big thanks to GitHub user emin93 for building and supporting the very handy react-native-template-typescript repo! I sure wish that I’d known about this when I initially bootstrapped my app.
At the time of writing, I was using Node v8.12.0 and react-native 2.0.1. Let’s begin:
react-native init MyReactNativeTypeScriptApp --template typescript
cd MyReactNativeTypeScriptApp/
node setup.js
To run the TypeScript compiler, and watch the filesystem for changes, run:
npm run tsc -- -w
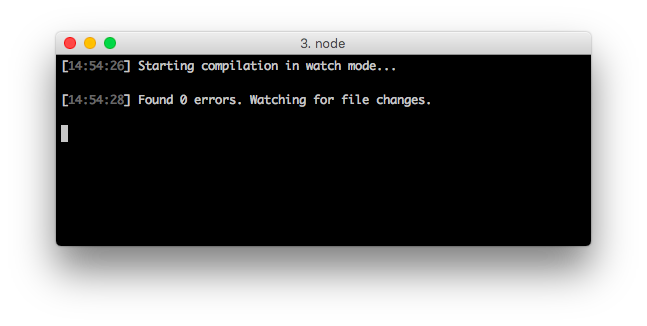
Annnnd we’re done! With TypeScript support, anyways. You should now have a terminal window open that is displaying something to the effect of:

At this point I’d recommend opening up the directory you’ve initialized your app into with the Visual Studio Code editor. It is free, has excellent support for TypeScript (both are built by Microsoft), and a big community behind it. You may need to install the code command in your path before running this:
code .
Not much there, right? I mean, outside of the node_modules directory, of course 😅. Keep the VS Code window open, and we’ll come back to it in a moment.
CocoaPods
I wanted to make this as real-world an example as possible, so we’re going to be setting up CocoaPods as well. CocoaPods is supported by a number of 3rd party RN libraries to quickly and easily wire up the parts of each library that involve native code. We’ll use it extensively over the next few blog posts on RN. This article on shift.infinite.red goes way deeper in depth on CocoaPods setup, but I am going to skip right to the commands I used to initialize my project.
If you do not yet have CocoaPods installed:
gem install cocoapods
Init CocoaPods in the ios/ directory:
cd ios/
pod init
Locate your Podfile in VS Code, or open it from the CLI:
code Podfile
Replace the contents of your Podfile with the following (assumes you’ve named your app MyReactNativeTypeScriptApp; simply replace that string if that’s not the case):
target 'MyReactNativeTypeScriptApp' do
  # Pods for MyReactNativeTypeScriptApp

  pod 'yoga', :path => '../node_modules/react-native/ReactCommon/yoga'

  pod 'React', :path => '../node_modules/react-native', :subspecs => [
    'DevSupport',
    'RCTLinkingIOS',
    'RCTImage'
  ]

  # We'll add the react-native-sqlite-storage package during a later post here

end

post_install do |installer|
  installer.pods_project.targets.each do |target|
    # The following is needed to ensure the "archive" step works in XCode.
    # It removes React & Yoga from the Pods project, as it is already included in the main project.
    # Without this, you'd see errors when you archive like:
    # "Multiple commands produce ... libReact.a"
    # "Multiple commands produce ... libyoga.a"

    targets_to_ignore = %w(React yoga)

    if targets_to_ignore.include? target.name
      target.remove_from_project
    end
  end
end
Tell CocoaPods to process your Podfile and install the Pods you’ve included above (still in the ios/ dir). NOTE! It is advised to close Xcode when running pod commands:
pod install
If successful, you should see a message printed to the console that indicates something to the effect of (check above the PBXBuildFile -- output):
Pod installation complete! There are 4 dependencies from the Podfile and 2 total pods installed.
If you see a failure at this point, I would recommend digging in to the shift.infinite.red article and resolving the issue before moving on.
OK! This is a good point to check that the app we just created is in fact runnable. To avoid over-complicating this tutorial I am going to focus on iOS only, but each dependency I have included is supported on Android as well. Per the pod install console output, make sure to use the MyReactNativeTypeScriptApp.xcworkspace file to open your iOS project from now on in Xcode. Still in the ios/ directory, run:
open MyReactNativeTypeScriptApp.xcworkspace
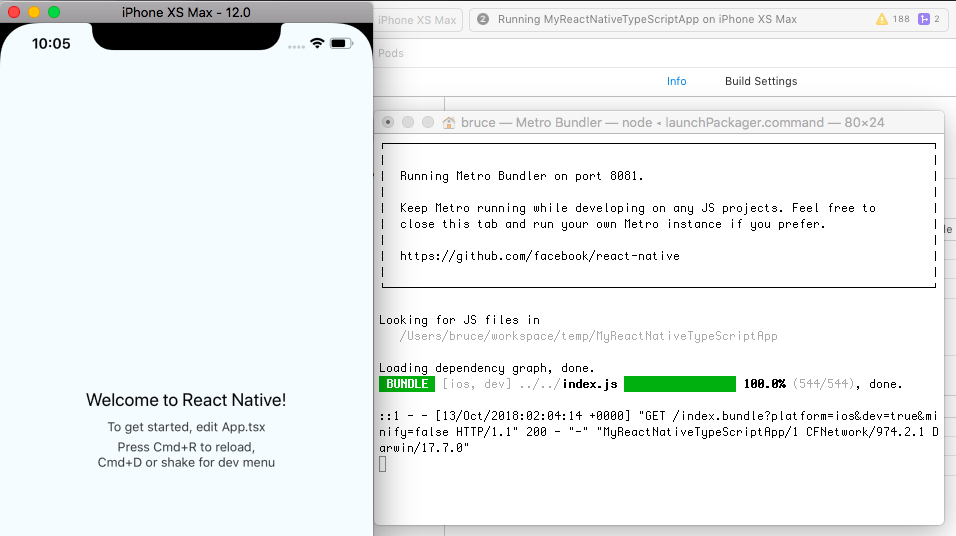
In Xcode, select a simulator to target and tap the Play button to build and run your app. With any luck, you should see the Metro Bundler open in a Terminal window, and the iOS simulator should show your app running alongside it. This could take a few minutes during the first run of the app since there’s lots of native code to be compiled:

Did you have an issue starting up the app? Try clearing the Metro cache, and running the app again from Xcode:
react-native start --reset-cache
Hot Reload
You’ve made it this far. Finally, let’s make a change to the code to see it reflected immediately in the iOS simulator. To enable this super-slick workflow, we will need to enable Hot Reloading. In the iOS simulator, tap Command+D to open the development menu.
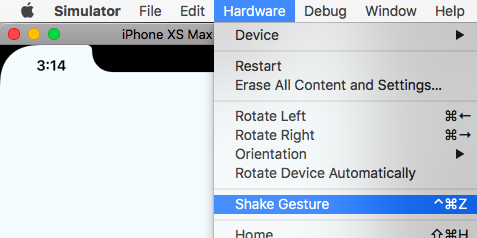
Did that not do anything? Sometimes this happens to me as well. Try triggering a “shake gesture” via the Hardware menu:

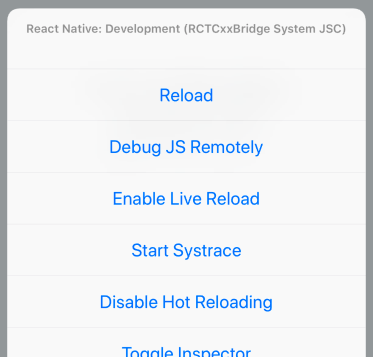
With the developer menu open, make sure Live Reload is disabled and Hot Reload is enabled. Your menu should look like this:

We’re now ready to make a change to the code. Open App.tsx with VS Code, and make a change to some of the text in the JSX of the App component’s render() function, such as changing “Welcome to React Native!” to “THIS IS AWESOME!”. Save the file. Observe the iOS simulator…
Within seconds your code change should be reflected in the simulator. This is one of my favourite features that the React Native toolchain enables, and I find I can get seriously productive when I see my code changes reflected immediately like this.
I hope you’ve found this useful! Stay tuned for more articles on my experience working on this project with React Native, coming soon.
Resources
I highly recommend working through the steps yourself to get all the latest dependencies, but you can find the result of running through these instructions here:
github.com/blefebvre/react-native-with-typescript-and-cocoapods-demo
Lastly, the app I wrote about in the intro is now live! Send an email to bruce at <this domain> if you’d like to try it out.
