The React Native project is evolving at a rapid pace, and it can be difficult to keep up with their release cadence. To make matters worse, the upgrade process has acquired the reputation of being painful and messy (I mean, it’s literally the number one complaint). With the latest hooks-compatible release candidate as my destination, I set out to get my SQLite demo app’s codebase upgraded from the ancient 0.57.4 release. What follows is a description of the approach I took, along with a number of tips and tricks for a successful upgrade.
Goal
I hope this article makes the upgrade process less intimidating. It doesn’t have to be a bad experience, and I think it’s important to not let your app fall too far behind the latest stable release. In working through the upgrade process for my own app I ended up taking a few wrong turns. This is the blog post I wish I had found.
Before you begin
Read the Upgrading to new React Native versions doc. Really. The whole thing! It’s not that long, and I’m not going to duplicate their content here. My experience below only covers one type of app: a project bootstrapped with react-native init. Other paths exists for Expo apps that make this process even easier.
Please make sure you are using git or another source control management system before attempting an upgrade. Create a new branch where you can hack away consequence-free, and keep a git reset --hard origin/master in your back pocket in case things go really sideways.
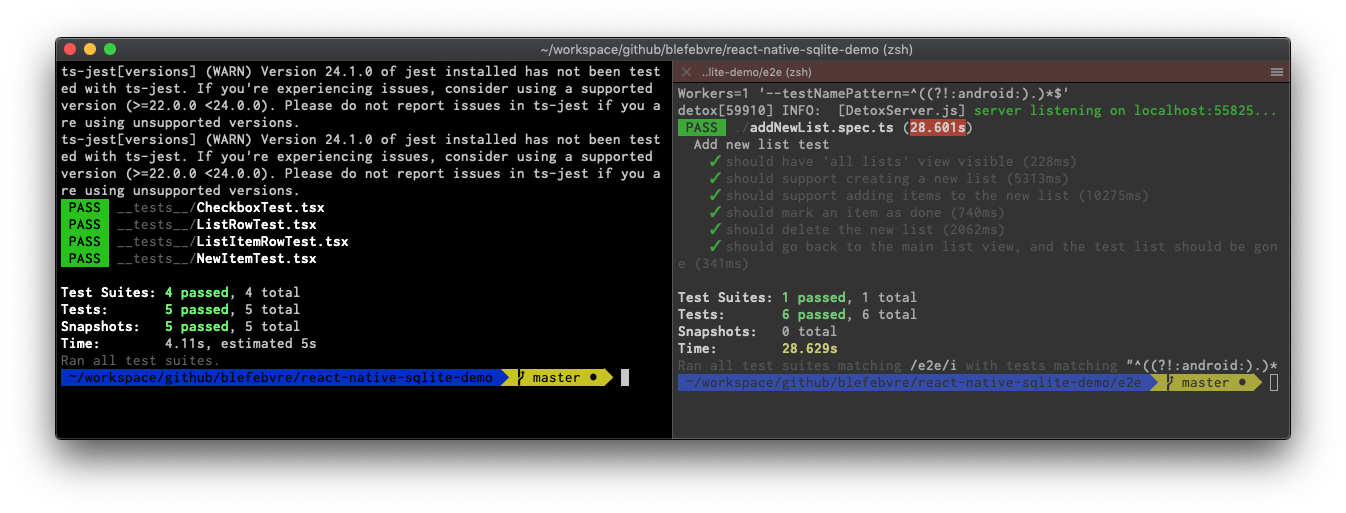
Also, make sure to run your entire suite of tests before beginning. There’s nothing worse that rolling back a bunch of work to find out that a test was breaking before you began your upgrade on the existing “stable” codebase! In my react-native-sqlite-demo’s case, this involves running the unit tests:
npm test
And then running the end-to-end Detox tests:
pushd e2e/
npm run test:e2e
popd
Begin!
At the time of writing, the React Native docs suggest using an npm module called react-native-git-upgrade to perform the upgrade. I tried this method first and ended up with a number of conflicts including some in the infamous ios/<project name>.xcodeproj/project.pbxproj file. This file can be long and cryptic at the best of times, and I would not recommend trying to resolve conflicts in it manually.
Instead, I propose trying the approach described in the README of the react-native-community/rn-diff-purge repository. Take a few minutes to read the README and familiarize yourself with this approach.
At a first glance this approach will seem far more manual and hands-on. And it is more hands-on. However, as someone who has worked through conflict resolution after a git-upgrade gone wrong, I can say with confidence that I much prefer a rn-diff-purge upgrade over the approach the docs recommend.
The process
#1: Locate the diff
Step 1 of this upgrade process is to identify your current version of the react-native module that is included in your project’s package.json. In my app’s case, this was version 0.57.4.
Head to the rn-diff-purge README and locate the next release’s version number. In my case this was 0.57.5. Beside this version number you will find a “Compare” link which in my case was 0.57.4…0.57.5. Open up this link in a new tab.
See? Not so bad, right? There are only 5 changes in this release! (Well, there are many additional changes included in the react-native module and it’s dependencies, but this is the extent of the changes which we need to apply manually).
#2: Apply the diff
Update the files identified by the Compare link.
As someone with a project that is currently single-platform, I was tempted to skip the Android related files. If you think you might support the other platform later on (whether Android or iOS), I would highly recommend applying all the changes. This will save you or a colleague the joy of having to go through this process a second time.
Note: be careful of code changes which include the rn-diff-purge app’s name, RnDiffApp, in code! Here’s an example I ran into from AppDelegate.m:

You should replace each instance of RnDiffApp with <your app's name>.
#3. Install
Every diff at the very least includes a version bump in package.json. In order to pull down the updated module, you will need to tell your package manager to fetch it:
npm install
Or yarn if that’s your preference.
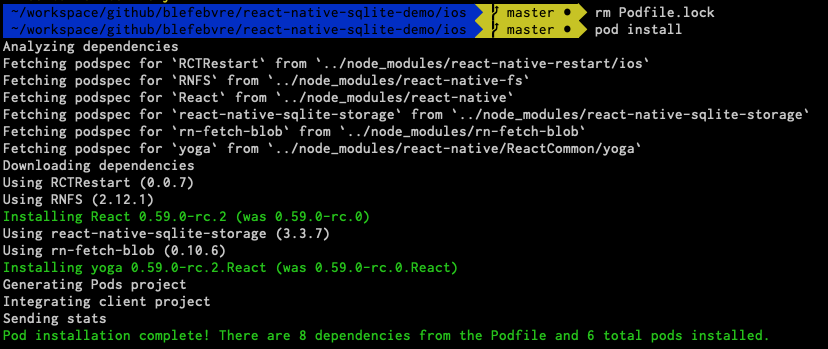
#4. (iOS only) Update Cocoapods
The Cocoapods’ Podfile references pods that are installed in node_modules/, so they need to be reinstalled each time the react-native version is bumped. I found the easiest way to do this was to first remove ios/Podfile.lock, and then trigger a reinstall:
pushd ios/
rm Podfile.lock
pod install
popd
You should see the upgraded version of React Native’s Cocoapods installed (in green text):
#5. Restart the Metro Bundler
The React Native Tools VSCode extension provides a button for this exact task:

If you are not using VSCode, this step will involve either closing the Terminal window running the Bundler, or killing the npm start command and re-running it.
#6. Verify: tests or manual
An automated suite of tests can give you confidence that this step of the upgrade has not wrecked anything. As mentioned above, in my case this step involves running unit tests followed by Detox end-to-end (e2e) tests. Make sure to build your e2e tests prior to running them, or you will get an error message that looks like this (on iOS):
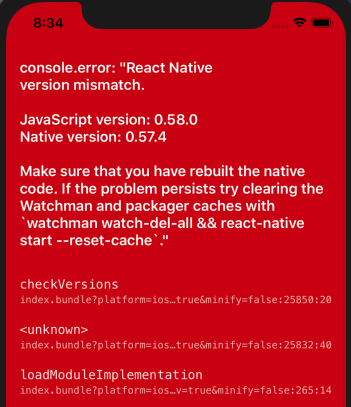
I love that the framework has this check. Without it, you run the risk of making your way through an upgrade process without ever actually testing the new native code.
Don’t have any tests? Hey, I’m not here to judge. Make sure to run the app and do some manual verification that things are working correctly before you proceed.
#7. Next!
Have you arrived at your target release version of React Native? If so, nicely done! 👏
If not, it is time to head back to step #1 and locate the next diff. Onwards!
Issues that I ran into
What follows are a series of minor issues that I ran into during my most recent upgrade.
./bundle/unbundle (?)
I had this interesting error appear in the Metro bundler window during the upgrade of 0.57.8 to 0.58.0:
internal/modules/cjs/loader.js:605
    throw err;
    ^

Error: Cannot find module './bundle/unbundle'
    at Function.Module._resolveFilename (internal/modules/cjs/loader.js:603:15)
This RN Github issue was the key: delete node_modules/ and run npm install (or yarn) again. Restart the bundler once complete.
Black app background
At some point during the upgrade I was instructed to make the following change to AppDelegate.m:
- rootView.backgroundColor = [[UIColor alloc] initWithRed:1.0f green:1.0f blue:1.0f alpha:1];
+ rootView.backgroundColor = [UIColor blackColor];
Since I had not set the background colour of my app in a Stylesheet, this had the exact effect that you might expect:
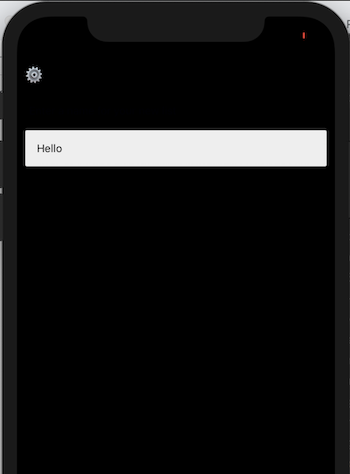
This change can be reverted if it affects your app. In fact, it gets undone in a diff a version or two later.
Detox tests fail to build
At some point in the upgrade my end-to-end (e2e) tests failed to build, with an error similar to the one described in this question:
error: Multiple commands produce '<path to iOS plist file>'
I had to switch to the Legacy build system in Xcode to work around this error, per this response.
You can watch this issue if you’d like to know when support has landed for the new build system in React Native.
Conclusion
I’m a big fan of the rn-diff-purge approach to React Native upgrades. I hope this article has made the process seem less intimidating, and shown you the steps that I followed to successfully upgrade my react-native-sqlite-demo app.