In the previous two posts we have bootstrapped a React Native project with TypeScript and CocoaPods, and then integrated an SQLite plugin to enable storing relational data on-device. Next, let’s take a look at using the Dropbox HTTP API to backup our database and enable synchronization between devices. We’ll begin by walking through support for the Dropbox v2 authorization flow in a React Native app, and then use the token we are granted to enable synchronization of our database file via the Dropbox files HTTP endpoints.

This post is accompanied by a fully-functional demo app that illustrates the approach:
github.com/blefebvre/react-native-sqlite-demo
Goal
When I began looking into this topic, my goal was to provide a way to backup and sync my user’s data without storing it on a server that I would need to implement (and maintain). I envisioned a use case where my app could be installed on more than one device (say, a user’s iPhone and iPad), and up-to-date data would be available on each device. While the app would depend on an internet connection to support this feature, it was important to me that the app continue to work “offline first” in the absence of connectivity.
At a high level, my concept for the overall experience looked like this:
- App is installed on an end user’s device.
- User inputs data into the app, and wishes to have a backup of their work.
- User authorizes with the Dropbox API. A token is granted to the app.
- App uses this token to upload the database file to Dropbox.
- App is installed by the same end user onto another device, such as an iPad.
- On the iPad now, the user authorizes with Dropbox and is granted another token.
- The app checks if a database file exists already on Dropbox.
- Since it does, the user is prompted to replace their local database with the Dropbox copy.
- Later on, each time the app starts up, the Dropbox API will be queried for the last updated timestamp of the database file.
- If the remote copy is newer than the device’s DB, the user will be prompted to download it and overwrite their local DB.
- On each subsequent write to the database, the database file will be sent to Dropbox via the HTTP API.
As a bonus: Dropbox keeps revision history for each file, so this approach would enable the user to go back in time to a previous version of their database, without requiring any additional code in the app to support this!
Like the other posts in this series, I am going to focus on iOS for any platform-specific configuration that is required.
Getting started
If you search for “react native dropbox” on Google, as I did, you may be encouraged by the number of relevant-looking results that are returned. However, digging a bit deeper will reveal a number of GitHub repos with big deprecation warnings, as well as some all-in-one authentication solutions which seemed overkill for what I was trying to do.
The approach below details how you can use the Dropbox API without installing any additional auth-related SDKs or packages.
The first step is to create an App on Dropbox’s developer page. Head to dropbox.com/developers, and follow the “Create your app” link to begin.

For “1. Choose an API”, select “Dropbox API”.
For “2. Choose the type of access you need”, select “App folder”.
For “3. Name your app”, up to you! Give it a relevant name for your project.
Click “Create app” to proceed.
Dropbox app console settings
You should now be looking at the Dropbox app console entry for your new app. There are a few settings which we’ll update here before we get into the code.
First, make note of your App key. We will need this value later on when constructing the request to authenticate from our React Native app. We will not need App secret for this use case.
Next, in the OAuth2 section, add a new Redirect URI in the following format:
unique.id.for.your.app://oauthredirect
For example, I have used com.brucelefebvre.rnsqlitelistapp.oauth://oauthredirect for my demo list app. Later on, we’ll need to set this id (the part before ://oauthredirect) as one of the CFBundleURLSchemes that our iOS app will respond to, so we can receive the token from Dropbox once our end user has granted the app permission.
Tap “Add” to add your Redirect URI.
With that, we’re ready to roll as far as the Dropbox app console is concerned. Before going live you will want to make sure you come back to this page and update your app’s branding with an icon, app description, publisher details, and a link to your app’s website.
React Native project setup
There are a number of ways that Dropbox could be integrated into a React Native app; what follows is merely my suggestion. This approach has worked well for me in the small side project app I shipped earlier this year. That said, I’d be interested to hear any thoughts you have on this approach in the comments.
There are a few 3rd party dependencies that I’ve added to help with various aspects of this feature, including:
- react-native-fs: for dealing with the filesystem
- rn-fetch-blob: uploading and downloading remote files in an efficient manner
- moment: working with timestamps
- react-native-restart: reloading the app
- shitty-qs: parsing query strings
These can all be added with the following command:
npm install --save react-native-fs rn-fetch-blob moment react-native-restart shitty-qs
The libraries that include native code need to be linked up to our Xcode project, so we’ll add three lines to our ios/Podfile (Where, exactly? Check out the complete Podfile):
pod 'RNFS', :path => '../node_modules/react-native-fs'
pod 'rn-fetch-blob', :path => '../node_modules/rn-fetch-blob'
pod 'RCTRestart', :path => '../node_modules/react-native-restart/ios'
Next, install the new Pods:
cd ios/
pod install
For the complete TypeScript experience, let’s install type definitions for the dependencies we just added:
npm install --save @types/react-native-fs
A keen eye will note that we’re only installing types for 1 of the 5 dependencies we installed above. Well, lucky for us, moment includes TypeScript support in it’s main npm package. rn-fetch-blob has a merged pull req to include a type definition in it’s package, but it’s not been released to npm at the time of writing.
If you’re really a TypeScript keener, as I am, you can take the not-yet-released index.d.ts from master and create the corresponding file in your project’s node_modules/rn-fetch-blob/ directory. Note that since this directory should be ignored by source control, taking this action will not benefit anyone else on your team, and will get overwritten if you install a new version of rn-fetch-blob later on.
Much better! Are you new to Cocoapods or TypeScript? I wrote a little post on bootstrapping a React Native project with both tools wired up: Get started with React Native, TypeScript, and CocoaPods
iOS project configuration
On the iOS project side, we need to ensure we have the RCTLinkingIOS React Cocoapod subspec included in our Podfile (which the demo app already does), as well as a bit of Objective-C code added to AppDelegate.m to support handling deep links into our app. The official React Native docs have details on the code snippet that you’ll need to handle deep links (immediately below the paragraph that states, “If you also want to listen to incoming app links during your app’s execution…”).
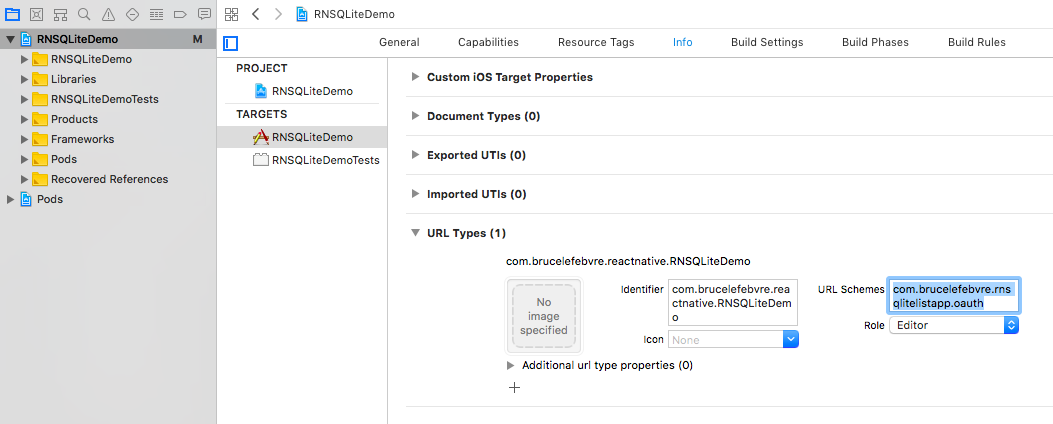
Our app needs to know which URL schemes to respond to. With our project’s *.xcworkspace file opened in Xcode, open the app’s properties editor and navigate to the Info tab. Here you will find the “URL Types” setting. Add a new item with the “URL Schemes” field set to the Redirect URI id value you chose during the Dropbox app console setup above (com.brucelefebvre.rnsqlitelistapp.oauth in my demo app’s case):
For more detail on this step, check out the “Register Your URL Scheme” section of the Apple dev docs.
And with that, we’re ready to get into the code.
Authorizing with Dropbox
In an attempt to keep this post readable, I am going to keep the code that I embed to a minimum and link to my (fully functional) demo app whenever possible.
Before we can sync anything with Dropbox we will need our user’s permission to do so. I’ve broken down the sync-related code into two interfaces in the demo app: Authorize and DatabaseSync. I attempted to keep these interfaces generic enough that another backend could replace the Dropbox implementation, if ever needed. You’ll find the Dropbox implementation of these interfaces in the src/sync/dropbox/ directory.
The Authorize interface defines 3 functions: one to authorize, one revoke the app’s token, and one to query if the user has already authorized:
export interface Authorize {
  authorize(): Promise<void>;
  revokeAuthorization(): Promise<void>;
  hasUserAuthorized(): Promise<boolean>;
}
In the Dropbox implementation, the authorize function opens the device’s browser to dropbox.com/oauth2/authorize complete with our app’s client_id (generated by Dropbox above), redirect_uri, a requested response type (token), and a randomly generated state value included as query parameters.
Aside! Why is this optional state value included? From the Dropbox API docs: [state can contain] “Up to 500 bytes of arbitrary data that will be passed back to your redirect URI. This parameter should be used to protect against cross-site request forgery (CSRF).” In other words, it enables us to verify if the deep link response from Dropbox is the one we are expecting, as opposed to a malicious user crafting a link that opens up our app with a Dropbox token that links to another account. I highly recommend that you make use of it in your implementation as well.
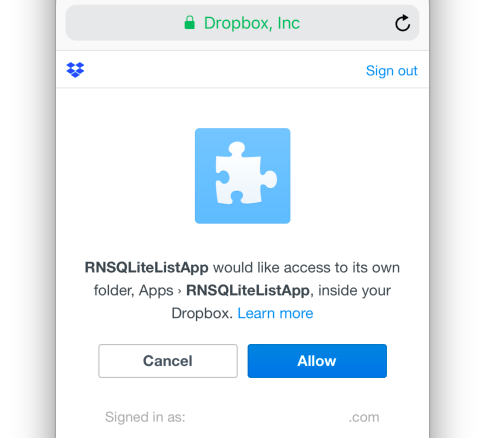
Once the user indicates they would like to link their Dropbox account (perhaps by tapping a button in the app), a web browser will open up to dropbox.com and either ask them to sign in, or take them right to the authorization step (if already signed in). How this page looks can be configured in the Dropbox app console to include your app’s logo and other metadata:
Let’s take a closer look at the Dropbox implementation in the demo list app, in DropboxAuthorize.ts. The React Native Linking.openURL() call returns a Promise which, once resolved, we attach a listener to the “uri” type (using Linking.addEventListener()). This enables our app’s JS code to be notified when the app is opened with a deep link that matches the URL Scheme we specified in Xcode.
With this logic in place, and our Xcode project configured correctly, the user will see a dialog like this asking if they would like to be taken back to our app once they tap the blue “Allow” button:
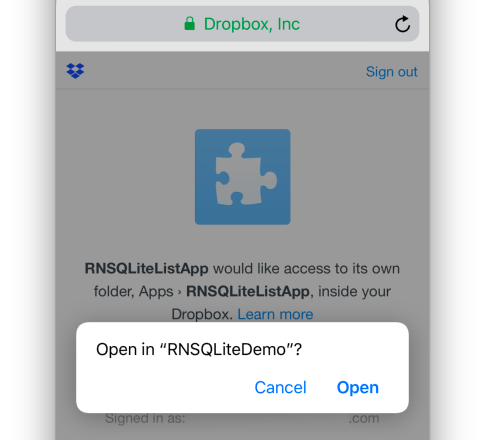
As “Open” is tapped, our Linking event listener callback will fire. In this function, we then parse the deep link’s query string, ensure that our state value matches what was passed back to the app, and lastly record the Dropbox access token and account ID values that were granted to us in AsyncStorage.
When to authorize?
In both my side project app and the SQLite list demo, authorizing with Dropbox is an optional step. Therefore, I did not include it in the app onboarding, and instead tucked it away in a settings screen. Your apps requirements may vary!
The settings screen I am describing is named SettingsModal.tsx and provides a button to kick off the authorization flow. Once authorized, the text and button change to enable the user to unlink the app from Dropbox.
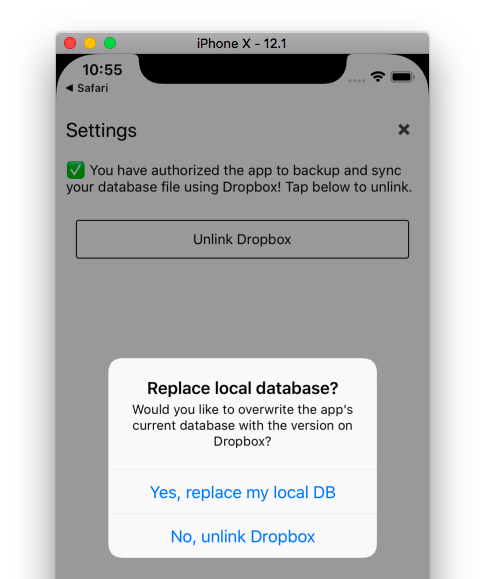
I bring up this screen because it is also the first time that an authorized app will interface with Dropbox. If this is the 2nd (or 3rd, 4th, etc.) device that this same Dropbox user is linking to their account, we need to provide the option to overwrite the local database with the version that is available in their account:
The code to support this check is of interest to the next piece of the puzzle: DatabaseSync.ts.
Syncing a database file
As with the authorization code, I have included a TypeScript interface in the demo app to define how a database sync implementation would look: DatabaseSync.ts:
export interface DatabaseSync {
  upload(): Promise<void>;
  download(): Promise<void>;
  hasSynced(): Promise<boolean>;
  hasRemoteUpdate(): Promise<boolean>;
  hasLastUploadCompleted(): Promise<boolean>;
}
hasRemoteUpdate()
The Dropbox implementation of hasRemoteUpdate() is a good place to jump in to the sync code since it will be our first call to the Dropbox API, post-authorization. And it’s relatively simple. From DropboxDatabaseSync.ts:
public hasRemoteUpdate(): Promise<boolean> {
    // [ Code omitted to check connectivity, and determine path of remote file ]
    return fetch(DROPBOX.GET_METADATA_URL, {
        method: "POST",
        headers: {
            Authorization: `Bearer ${dropboxAccessToken}`,
            "Content-Type": "application/json"
        },
        body: JSON.stringify({
            path: dropboxFilePath
        })
    }).then(response => {
        // [ Code omitted to process response and compare to last uploaded timestamp ]
    });
}
The key bits to note are that we are making a standard fetch call in this function, and must include Bearer <Dropbox access token> as the Authorization header value. Including this token will be required for all future interactions with the Dropbox API.
upload()
When the app is initially linked to a user’s Dropbox account, there will be no existing database file present. The first step in this case is to perform the first upload of the database. The code which performs this upload is the upload function in DropboxDatabaseSync.ts.
The upload code can be broken down into 2 distinct operations. First, the connection to the DB is closed and a copy of the database file is made, from FILE_NAME to BACKUP_FILE_NAME (defined in src/database/Constants.ts). I use the react-native-fs package to efficiently handle deleting the previous backup file and creating the new copy. Once complete the database is reopened and the upload() function’s Promise is resolved.
Why is the Promise resolved already? The upload hasn’t even begun yet! Sticking with the offline first approach, I need to avoid blocking the UI while waiting for an upload to complete. Since mobile networks can be unreliable – for example, reporting connectivity but not supporting enough bandwidth to actually do anything – I took the approach that the upload should happen in the background. With this approach I do the minimum amount of work necessary while the database is closed (the copy operation), and then kick off the upload after the fact.
The 2nd part of the upload is the actual file upload. In order to support efficient binary file transfers I have incorporated the rn-fetch-blob package, which avoids the Base64 bridging typically needed for file access in React Native. I found this the best way to actually upload content to Dropbox, after a number of failed attempts of uploading without it (related issue and post on the subject).
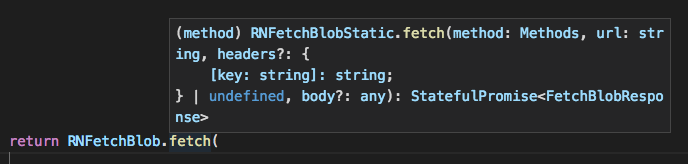
The key piece of this operation is the call to RNFetchBlob.fetch() in the uploadDBToDropbox() function:
RNFetchBlob.fetch(
    "POST",
    DROPBOX.UPLOAD_URL,
    {
        Authorization: `Bearer ${dropboxAccessToken}`,
        "Content-Type": "application/octet-stream",
        "Dropbox-API-Arg": JSON.stringify({
            path: dropboxFilePath,
            mode: "overwrite"
        })
    },
    RNFetchBlob.wrap(localFilePath)
)
Note that we’re “wrapping” the path to our local DB backup file, and that we’re not using the standard fetch call but instead using the one provided by RNFetchBlob.
download()
If our hypothetical user were to then install our app on another device and link it to the same Dropbox account, the initial call to hasRemoteUpdate() would return true. The user would then be prompted to replace their local database with the version from Dropbox. Upon their agreement, the download() function would be called.
Like upload, this function also makes use of the rn-fetch-blob package. The key piece of code that performs the download looks as follows, and can be found in DropboxDatabaseSync.ts:
RNFetchBlob.config({
    // Downloaded DB will be saved to this path
    path: this.getLocalDBFilePath()
}).fetch("POST", DROPBOX.DOWNLOAD_URL, {
    Authorization: `Bearer ${accessToken}`,
    "Dropbox-API-Arg": JSON.stringify({
        path: this.getDropboxFolder() + this.getDatabaseBackupName()
    })
})
The last important step of this process is to record the timestamp that we received as part of the response from Dropbox:
// Store client modified value (contained in clientModifiedString)
return AsyncStorage.setItem(
    DROPBOX.MOST_RECENT_BACKUP_TIMESTAMP_KEY,
    clientModifiedString
);
If, for whatever reason, we do not complete the download() call, this timestamp will not be recorded and the download will be attempted again the next time the app is launched. Speaking of DROPBOX.MOST_RECENT_BACKUP_TIMESTAMP_KEY (one of the DropboxConstants)…
hasSynced()
This function will simply check for a value stored in AsyncStorage at the DROPBOX.MOST_RECENT_BACKUP_TIMESTAMP_KEY key. It is a helper function to enable the DatabaseSynchronizer class to determine if it needs to bother checking for an update at all.
hasLastUploadCompleted()
Another helper function. Like hasSynced(), a call to this function will check the value of a key in AsyncStorage. If DROPBOX.LAST_UPDATE_STATUS_KEY is set to the value of DROPBOX.UPDATE_STATUS_FINISHED, true will be resolved. If the key is unset or set to any other value, the function will resolve false.
This function is called from the DatabaseSynchronizer class reconcileDatabaseChanges() function. If it returns false, then we know that the previous upload to Dropbox never completed. Therefore, assuming there was not a conflicting change made to the Dropbox file from another device, we will attempt the upload again.
Triggering an upload
The action that triggers an upload of the database to Dropbox is completely up to you. It can be a manual step, or it can happen each time the database is written to. The latter approach is the one I have taken with the demo list app.
To implement the upload-on-each-write approach, I have added a databaseSync.upload() call to the end of each of the Database functions which INSERTs, UPDATEs, or DELETEs data. For an example, check out Database.ts.
    // Queue database upload
    return this.databaseSync.upload();
Since all of the database functions already return a Promise, it was simple to add this call right at the end of each function’s existing Promise chain. You’ll recall from above that the upload() call briefly closes the database, but it’s Promise chain will resolve immediately after the copy is complete and the database is reopened; it does not wait for the upload itself to complete.
Downsides to this approach
This approach has worked well for me, but it is not going to work for many apps. Perhaps most apps. Apps that would not be good candidates for this approach would likely have one or more of the following characteristics:
- Require frequent database writes that occur in quick succession (for example, an app that records location data a few times per second)
- Contain a large database. Since we back up the entire database on each save, this approach does not make sense when the database is big.
- Require sharing data with other users of the app. The database is self-contained on device, so there is no way to have a relationship with another user’s data.
In conclusion
I hope this post has shed some light on how I was able to implement an SQLite database sync feature in a React Native app without supporting a server of my own. I welcome any thoughts or questions you have on the approach I have taken.
If you would like to see this code in action, I recommend checking out the demo app that I have been referencing throughout this post. It is completely functional out-of-the-box on iOS (includes my sample Dropbox client ID generated above). You can check it out on GitHub here:
github.com/blefebvre/react-native-sqlite-demo
What’s next, Bruce? I have a post in the works on component & end-to-end testing, and plan to cover the process of updating to the latest React Native release shortly after that.