What follows is a refresh of my most-read post, originally published in 2018. The code and content has been given a complete overhaul for 2020 to feature Hooks, Context, and updated to use React Native 0.61.5. The text has been condensed too because man did I ever ramble on back then 😅.
This article walks through how I built an offline first React Native app using a device-local SQLite database, and details the patterns that I would recommend following when building your own.
Why?
Why might you pursue building an offline first app with an integrated database?
- There’s no server for you to manage, patch, keep online, and serve as a single point of failure for your app
- No server-side code to develop, debug, load test, and monitor
- The app will work offline without any extra effort, since the entire datastore will be contained in the app’s sandbox directory
- If your users’ wish to sync their data with another device, the app can be integrated with a service like Dropbox (a pattern I’ve seen work well in other apps, such as pre-version 7 1Password)
When it comes to storing relational data on-device with minimal overhead, SQLite is the natural choice. It’s fast, rock solid, and has been battle tested for years across a huge array of platforms and devices.
Let’s begin by adding the native SQLite bits to an existing React Native app (RN going forward) that’s built with the excellent combo of TypeScript and CocoaPods. Looking for steps to bootstrap an app like this? Take 10 minutes and work through the official docs on the subject first: Using TypeScript with React Native.
Why not?
It’s worth noting that this approach will not work for every app. For example, if data must be shared with other users of the app, an approach involving a centralized database service is likely more appropriate.
What are we building?
I created a basic List app using the approach outlined below so I could share a working example of these concepts (and code) in action. It can be found here:
Check out React Native SQLite Demo on GitHub.
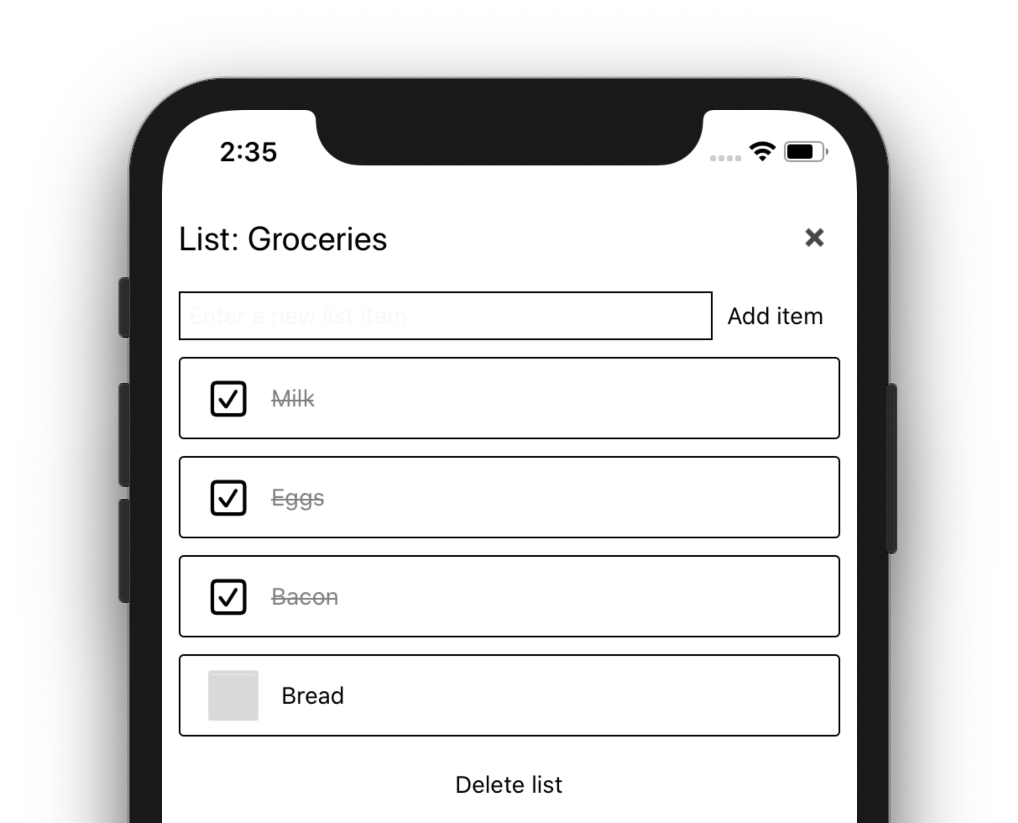
It’s only been tested on iOS at this time, but the native plugins and JS code should both work on Android as well.
Installing the SQLite plugin
My SQLite plugin of choice is react-native-sqlite-storage, built by GitHub user Andrzej Porebski. It’s been very solid, supports a Promise-based API, and there is a TypeScript type definition available which checked all the boxes for me. The only downside I can find with this plugin is that it doesn’t seem super active at the moment. That said, pull requests are occasionally being merged, so I am optimistic that it will continue to be maintained.
The steps below cover iOS exclusively. Refer to the plugin’s README instructions for details on installing the plugin for Android.
From the root directory of your RN app, install the plugin using npm (or yarn, if you prefer):
npm install --save react-native-sqlite-storage
At the time of writing version 5.0.0 was the latest.
Note: the plugin’s README claims the next step is no longer necessary with RN 0.60+, but it still was for me.
Add the following line to your ios/Podfile:
pod 'react-native-sqlite-storage', :path => '../node_modules/react-native-sqlite-storage'
cd into the ios/ directory, and tell CocoaPods to process your Podfile:
cd ios/
pod install
You should see a line printed to the terminal that indicates that the Pod is being installed: “Installing react-native-sqlite-storage (5.0.0)”.
Installation complete! Did CocoaPods really save us any work, here? I think it did!
Don’t forget the Types
To reap the full benefits of building a SQLite project with TypeScript, we’ll need to install a TypeScript type declaration for the plugin we just added. This will enable Visual Studio Code (or any other TypeScript-capable code editor) to perform static analysis on our code while we write, provide hints at what functions and properties are available to us (also known as intellisense), and let us know if we’ve provided an incompatible parameter to one of those functions. I’m a huge fan and highly recommend trying it out if you are at all skeptical.
To install the type declaration for the react-native-sqlite-storage plugin:
# make sure you are in the root of the app, not the ios/ dir
npm install --save-dev @types/react-native-sqlite-storage
Let’s take a moment to test that everything is working so far. If you have not done so already, open up the app in Visual Studio Code, or another code editor that works well with TypeScript:
code .
Locate and open App.tsx. Add the react-native-sqlite-storage import toward the top of the file, just below the ‘react-native’ import line.
import SQLite from "react-native-sqlite-storage";
Still in App.tsx, add the following useEffect block to try it out (assuming you are using React function components):
useEffect(function() {
    SQLite.DEBUG(true);
    SQLite.enablePromise(true);

    SQLite.openDatabase({
        name: "TestDatabase",
        location: "default"
    }).then((db) => {
        console.log("Database open!");
    });
}, []);
What’s that? You don’t like putting database code directly in your main App component? Don’t worry! This is just temporary to make sure things are wired up correctly. We’ll remove it shortly.
If you were to type the above code into App.tsx instead of copy/pasting it, you would notice something magical happening:

VS Code is able to give us intelligent tooltips (amongst other things) about the SQLite plugin because we installed it’s type declaration file above! This is extremely handy, especially when experimenting with a new API. We also installed the React and React Native types as part of a previous article, to enable this same effect for the entire React and RN APIs.
Build and Run the app
Run the TypeScript compiler in watch mode. In my demo app’s case, this is a matter of keeping a terminal tab/window open with the following command running (runs tsc -w under the hood):
npm run watch
Next, build and run your app from Xcode targeting a simulator of your choice. Once it’s running, open up the RN developer menu from the app (use Command+D, or Hardware > Shake Gesture) and tap “Debug” to open up a Chrome window attached to your app. With the debugger attached, Chrome devtools open, and everything wired up correctly, you will be able to see Database open! logged to the console:
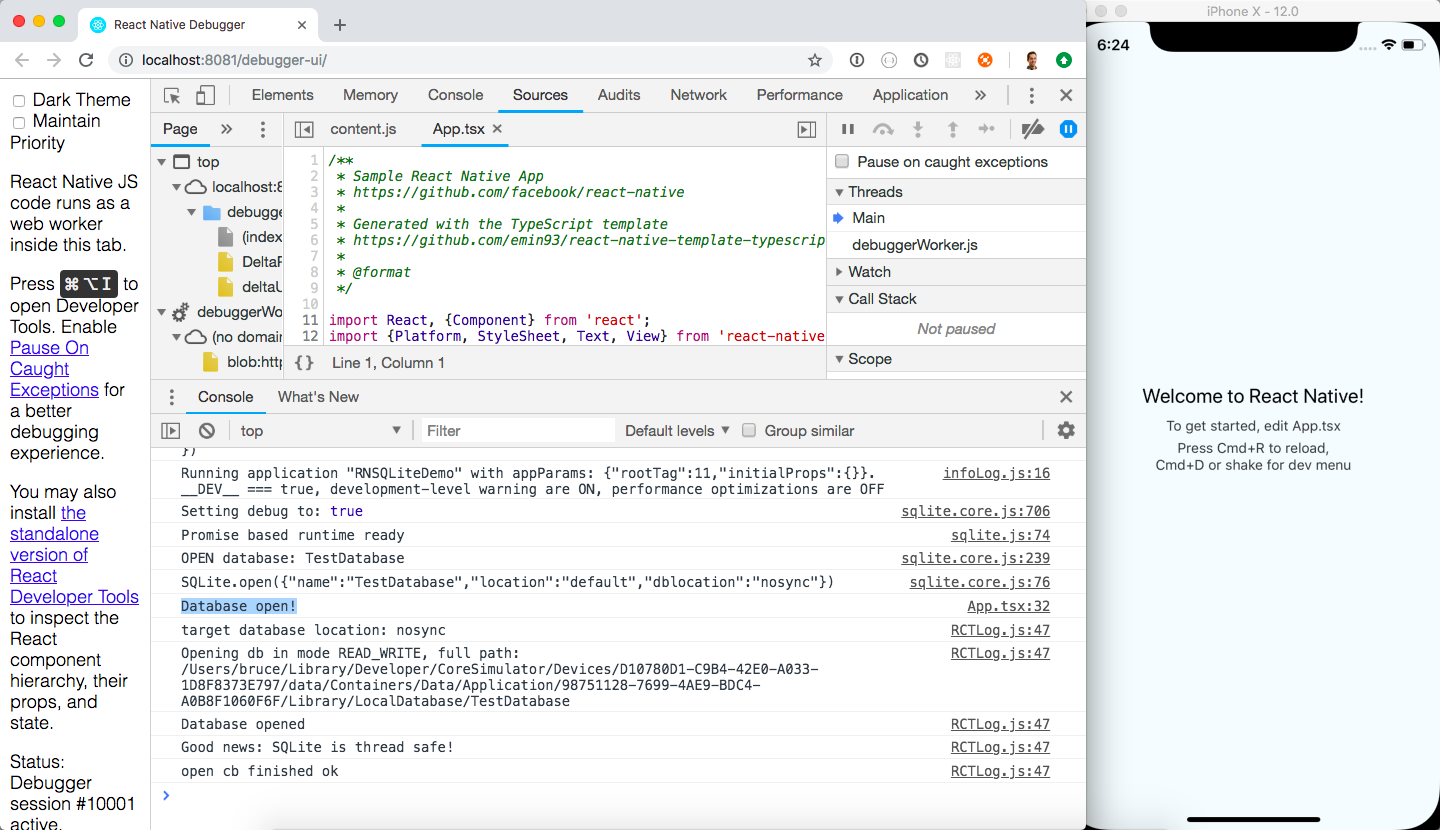
Alright! This indicates to us that the SQLite plugin has been installed correctly. It also means that we’ve installed all the native iOS bits that we need for this article, so we will not have to build and run the app from Xcode again. Instead, make sure to toggle “Enable Fast Refresh” from the app’s developer menu, and the app will “refresh” - without losing existing app state - to show your latest changes as soon as you’ve saved a file.
☝️ this is one of my favourite features of building apps with React Native. Make sure this is all working before moving on (try making a change to App.tsx to verify).
Project architecture
What follows is the way that I have designed my offline-first React Native app, built with SQLite. Is it the best way? Perhaps not, but I’ve found it maintainable and easy to work with, and it provides flexibility to evolve your schema over time.
Key points about this approach:
- The
Databaseinterface (a TypeScript interface - more on this later) implementation is exposed via theuseDatabasehook. - A database connection is opened when the database is first accessed, and disconnected when the app goes to the background.
- All CRUD operation code is contained in the Database file. An InMemoryDatabase implementation is provided as well, to show how a generic/underlying-tech-agnostic interface can enable more straightforward technology changes later on.
- There is a separate
DatabaseInitializationclass which is used to initially create the SQL tables for the schema, and handles any schema changes after the app has been shipped to the app store(s).
Let’s take a look at the structure of the Database file. You can find the complete file on GitHub here:
import SQLite from "react-native-sqlite-storage";
import { DatabaseInitialization } from "./DatabaseInitialization";
// ...

export interface Database {
  // Create
  createList(newListTitle: string): Promise<void>;
  addListItem(text: string, list: List): Promise<void>;
  // Read
  getAllLists(): Promise<List[]>;
  getListItems(list: List, doneItemsLast: boolean): Promise<ListItem[]>;
  // Update
  updateListItem(listItem: ListItem): Promise<void>;
  // Delete
  deleteList(list: List): Promise<void>;
}

let databaseInstance: SQLite.SQLiteDatabase | undefined;

// Insert a new list into the database
async function createList(newListTitle: string): Promise<void> {
  // ...
}

// Get an array of all the lists in the database
async function getAllLists(): Promise<List[]> {
  // ...
}

// Other CRUD functions omitted

// Export the functions which fulfill the Database interface contract
export const sqliteDatabase: Database = {
  createList,
  addListItem,
  getAllLists,
  getListItems,
  updateListItem,
  deleteList,
};
Note how there is a Database interface exported at the top, which the exported sqliteDatabase object matches. I was tempted to say “implements” here but that is no longer accurate, since this is not a class! This helps us avoid some of the extra code that was needed in the original iteration of this post which handled managing a singleton of the DatabaseImpl class.
Why bother with the interface at all? I like the process of defining a contract that important objects like this will need to adhere to. This makes it easy if you ever need to switch to another persistance mechanism: simply create the CoolNewDB object and have it match the functions of your Database interface, and swap out where it’s used in the app’s database context provider. Speaking of context…
React Context
Now that it’s 2020 and we’re working in a world with hooks, it has become so much easier to make an object available to an entire tree of React components - no prop drilling required. Allow me to illustrate the positive effect this can have on a SQLite app.
With our sqliteDatabase exported above, the following DatabaseContext.tsx file (about 15 lines of code excluding comments) is all that’s needed to set up a context Provider, and the corresponding hook to pull the database object from context. All wrapped up in a simple, tidy package:
import React, { useContext } from "react";
import { Database, sqliteDatabase } from "../database/Database";
import { inMemoryDatabase } from "../database/InMemoryDatabase";

// Initialize our Database context.
// Any implementation that matches the Database interface will do. We will go with our
// sqliteDatabase for this app.
const DatabaseContext = React.createContext<Database | undefined>(undefined);

// The provider which enables accessing our database context from it's component tree.
export const DatabaseProvider: React.FunctionComponent = function(props) {
  return <DatabaseContext.Provider value={sqliteDatabase} {...props} />;
  // Alternatively, try the InMemoryDatabase instead by commenting out the above line,
  // and uncommenting the one below.
  //return <DatabaseContext.Provider value={inMemoryDatabase} {...props} />;
};

// Hook to pull our database object from the context and return it.
// Inspired by the Kent C. Dodds approach to using context: https://kentcdodds.com/blog/how-to-use-react-context-effectively
export function useDatabase(): Database {
  const database = useContext(DatabaseContext);
  if (database === undefined) {
    throw new Error("useDatabase must be used within a DatabaseProvider");
  }
  return database;
}
Since this context (and hook) are only concerned with exposing a Database-compliant object, the SQLite implementation can be swapped with another in a single line of code! I’ve included an example above on how you can easily switch to the inMemoryDatabase implementation.
The hooks effect
No, not useEffect. The main, hugely positive effect that I have experienced when moving completely from classes to working with React Function Components and hooks, is the effect of having these composable building blocks in the form of custom hooks (like useDatabase above) at my disposal. Allow me to illustrate with an example.
Just because I have abstracted away the SQL-specifics behind a domain (List) specific Database interface exposed by a useDatabase hook, does not mean that I always need to access the app’s data directly in this way. Instead, I can add any number of hooks which use useDatabase to provide an even nicer layer to interact with my app’s data. For example, in each component that shows Lists, let’s say I found myself duplicating the following logic:
- component renders, calls
database.getAllLists() - update component state with the result of
getAllLists - user takes some action, ie. add or delete a list
- when complete, call
database.getAllLists()again to refresh the list of Lists - update state again…
These repetitive and error-prone steps can be contained in a single place, with an elegant and simple interface exposed to access the underlying data. In my demo list app, this is illustrated with the useLists hook. With it, list management could not be simpler:
  // Use the useLists hook to simplify list management.
  const { lists, createList, deleteList } = useLists();

  // Simplified snippets from the component's JSX
  <FlatList
    data={lists}
    renderItem={({ item }) => /* render item */ }
  />

  <NewItem
    handleCreateNewItem={createList}
  />
I highly recommend leveraging custom hooks to expose your app’s SQLite data. And once you have them, feel free to use them as building blocks to construct even more developer-friendly layers as needed.
Database Connection management
There used to be a long section here on opening/closing a database connection at the right times, based on the app’s state. I’ve reworked this completely and now leave it up to the Database object to manage it’s own connections. This enables better separation of concerns within the app: the top-level App component no longer needs to be concerned with the underlying implementation of the datastore. It also enables a simplification of the interface: no need to include open() and close() functions. Win win!
The top level App component does still manage an AppState event listener which is used to determine when it should synchronize the database:
  // Function to run when the app is brought to the foreground
  async function appIsNowRunningInForeground() {
    console.log("App is now running in the foreground!");

    // Sync the database with Dropbox
    const syncDatabase = useDatabaseSync(prepareForDatabaseUpdate);
    syncDatabase();
  }
For more detail on backing up and syncing the database with Dropbox, check out Sync your React Native SQLite database between devices with Dropbox.
TypeScript + React sidebar
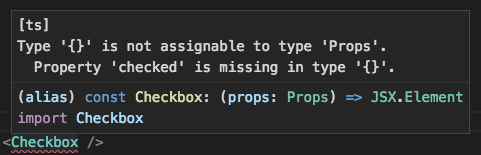
A nice feature of writing React code with TypeScript is that you can precisely define the shape of the object you expect to receive as props, and your IDE can throw up a flag when you get it wrong. I find this a much more straightforward approach than the previous React-specific solution of using PropTypes (now available on npm as prop-types). Let’s have a look at the Checkbox component to see how this works within a basic function component:
interface Props {
  checked: boolean;
}

export const Checkbox: React.FunctionComponent<Props> = function(props) {
  const { checked } = props;
  return (
    <Text accessibilityLabel={`checkbox:${checked ? "checked" : "unchecked"}`} style={styles.check}>
      {checked ? "☑" : "⬜"}
    </Text>
  );
};
This little component is expecting a props object with only 1 property: checked, a boolean. If you use this component without specifying a checked prop, or give it something other than true or false, the TypeScript integration in VS Code will tell you about your mistake before you even hit save:
Initializing your database
OK! Back to the database.
Since we are using an SQLite database under the hood, we have to define our schema before we can store anything in it. Additionally we will need to provide a way to update this schema as our app evolves, and enable the database tables to be ALTER‘d once the user has downloaded an update from the App Store or Google Play.
To support both these cases we will introduce a new class named DatabaseInitialization.ts, which will take the following form (you can check out the entire class on GitHub here):
import SQLite from "react-native-sqlite-storage";

export class DatabaseInitialization {

  // Perform updates to the database schema
  public updateDatabaseTables(database: SQLite.SQLiteDatabase): Promise<void> {
    let dbVersion: number = 0;

    // First: create tables if they do not already exist
    return database
      .transaction(this.createTables)  // this.createTables is a reference to a function below
      .then(() => {
        // Get the current database version
        return this.getDatabaseVersion(database);
      })
      .then(version => {
        dbVersion = version;
        console.log("Current database version is: " + dbVersion);

        // Perform DB updates based on this version
        if (dbVersion < 1) {
          // Uncomment the next line, and include the referenced function below, to enable this
          // return database.transaction(this.preVersion1Inserts);
        }
        // otherwise,
        return;
      });
  }

  // Perform initial setup of the database tables
  private createTables(transaction: SQLite.Transaction) {
    // List table
    transaction.executeSql(
      "CREATE TABLE IF NOT EXISTS List( " +
        "list_id INTEGER PRIMARY KEY NOT NULL, " +
        "title TEXT" +
      ");"
    );

    // ListItem table
    transaction.executeSql(
      "CREATE TABLE IF NOT EXISTS ListItem( " +
        "item_id INTEGER PRIMARY KEY NOT NULL, " +
        "list_id INTEGER, " +
        "text TEXT, " +
        "done INTEGER DEFAULT 0, " +
        "FOREIGN KEY ( list_id ) REFERENCES List ( list_id )" +
      ");"
    );

    // Version table
    transaction.executeSql(
      "CREATE TABLE IF NOT EXISTS Version( " +
        "version_id INTEGER PRIMARY KEY NOT NULL, " +
        "version INTEGER" +
      ");"
    );
  }

  // Get the version of the database, as specified in the Version table
  private getDatabaseVersion(database: SQLite.SQLiteDatabase): Promise<number> {
    return database
      .executeSql("SELECT version FROM Version ORDER BY version DESC LIMIT 1;")
      .then(([results]) => {
        // return the DB version
      });
  }
The complete class on GitHub includes further comments and example code detailing how the schema update process works. To provide additional context on why this is necessary, I will outline the steps taken by updateDatabaseTables() below:
- SQL tables, as described in
createTables, are created in a single transaction if they do not already exist. This is not the place for schema updates once your app has shipped, unless that update is a completely new table! - The
Versiontable is then queried to determine which version the app’s local database is at. This version is then used to determine if schema changes are needed. For example, if the schema has been changed during a recent app store update. - (optional, when schema updates have been made to a production app) The version number found in the
Versiontable is then compared to a hardcoded version number. For example, if the version is less than1, thepreVersion1Insertsfunction (read: user’s app is in a “pre version 1” state) is called which executes any number of database changes in a single transaction, getting the database set up to match version1. - (optional, when additional schema changes are needed) Once the
preVersion1Insertsare complete – or in the case where the database version was at1already – the database version can be checked again as many times as needed, to get the schema up-to-date with the code contained in the newly-updated app binary.
CRUD operations
All the Create, Read, Update and Delete code for dealing with Lists and ListItems in my RN SQLite Demo app is contained within the Database.ts file. I like this approach because the rest of my app can be completely ignorant to how data is being stored, and I have the option to cleanly swap out the SQLite database object for another implementation using a completely different persistence mechanism in the future, should the need arise.
As an example, what follows is a function in Database.ts for creating a new List with a provided name:
async function createList(newListTitle: string): Promise<void> {
  return getDatabase()
    .then((db) => db.executeSql("INSERT INTO List (title) VALUES (?);", [newListTitle]))
    .then(([results]) => {
      const { insertId } = results;
      console.log(`[db] Added list with title: "${newListTitle}"! InsertId: ${insertId}`);

      // Queue database upload
      return databaseSync.upload();
    });
}
Make sure to use prepared statements (the ? syntax) instead of constructing a string SQL statement yourself, to avoid making your DB vulnerable to SQL injections.
In conclusion
In case it wasn’t clear above: I am a huge fan of the approach of using SQLite on-device in a React Native app, and combining it with TypeScript makes for a truly enjoyable (and productive) development experience. While my code above is simply a demo, I took the exact approach with it that I have used in my side project app, which is currently live in the App Store.
But Bruce, is this not an “offline only” app, as opposed to offline first? Indeed it is. Click below to read on about how you can use the Dropbox API to sync your app’s database file between devices, giving you some of the benefits of having a server (backup and sync, namely), with very few of the headaches:
Next up: Sync your React Native SQLite database between devices with Dropbox